Mastering Kubernetes Deployment Strategies: Complete End-to-End Guide with Real Example
Kubernetes offers many deployment options for your applications, and what options you implement determine whether your strategy is smooth or risky.
In this article, we will walk you through the most important deployment options, using a real example that you can follow through, to understand exactly what you can do. This example will work on any kind of cluster, so you don’t need any fancy setup to follow along.
TL;DR? Check the video instead:
Kubernetes Deployment Strategies
Before diving into the real example, let’s first explore what are the most important Kubernetes deployment types. By choosing a deployment strategy, you will determine how your applications are upgraded to a new version. You should keep in mind that some of these deployment types will introduce downtime.
These are the most common Kubernetes deployment types:
1. Recreate: Stops all old pods before starting new ones. This is the simplest strategy, but it causes downtime.
2. Rolling update: This is Kubernetes’ default deployment strategy that replaces pods gradually and offers minimal downtime
3. Blue-Green Deployment: In this strategy, you run two environments, Blue being the current version, and Green being the new version you want to deploy, flipping traffic instantly when you are ready. This introduces no downtime, and you have an instant switch for your traffic.
4. Canary Deployment: In canary, you send a small fraction of traffic to the new version of your application, gradually increasing it as soon as your application passes testing performance changes
5. Argo Rollouts: With Argo Rollouts or even Flagger, you can automate canary, blue-green, and other deployments using Kubernetes CRDs and metric analysis for safer and automated rollouts
6. Shadow Deployment: In this strategy, you duplicate real traffic to a new version of your application, but you ignore responses. This is usually used for testing latency and performance, and helps you validate real traffic safely
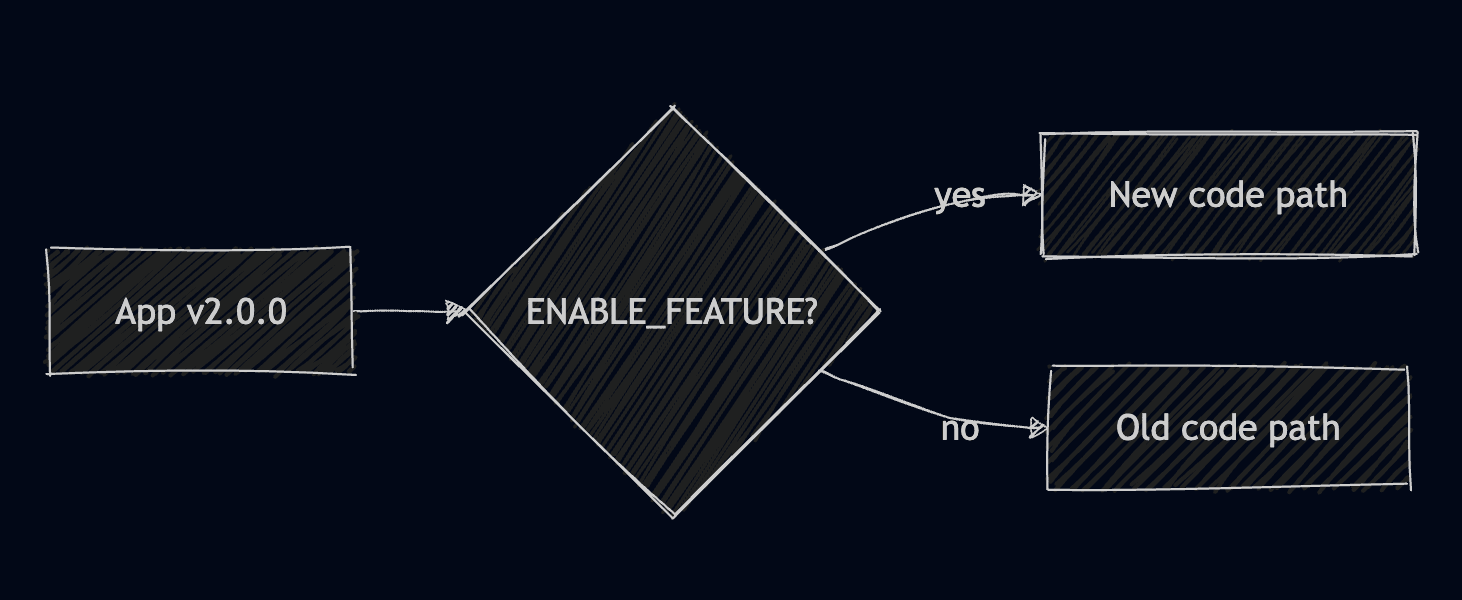
7. Feature flags: By using feature flags, you ship features hidden behind configuration toggles. They can be enabled gradually at runtime for certain users or segments
8. A/B testing: In A/B testing you experiment with different versions of your application for specific user segments
9. Ramped (Slow) Rollout: In this strategy, you intentionally throttle the rollout speed and pause between steps to validate performance metrics manually. This can work in conjunction with other strategies.
Let’s now walk through these strategies in detail. You will need to have a Kubernetes cluster up and running and install the NGINX Ingress controller. For the majority of the examples, I will use a minikube cluster with the ingress addon enabled.
If you are also using minikube, you can enable the ingress addon by running:
minikube addons enable ingress
minikube tunnel
To install the NGINX ingress controller, you can simply run:
kubectl apply -f https://raw.githubusercontent.com/kubernetes/ingress-nginx/main/deploy/static/provider/cloud/deploy.yaml
We will use a simple NGINX application, and you can find the code for everything that we will do here.
Our base application uses a configmap to serve an index.html file to our nginx pods. We also have a service that exposes port 80, and an ingress that points to that service.
This can be found in the base_app.yaml.
You will notice that all of these examples use the localhost host for the Ingress resource, and this will work just fine for a local setup. If you are, however, using a managed Kubernetes service, ensure you set a real FQDN for each Ingress and point DNS to the service’s LoadBalancer address. You can use ExternalDNS to automate DNS records.
The first thing we will do is apply this code by running:
kubectl apply -f base_app.yaml
You should then see that your application is running:
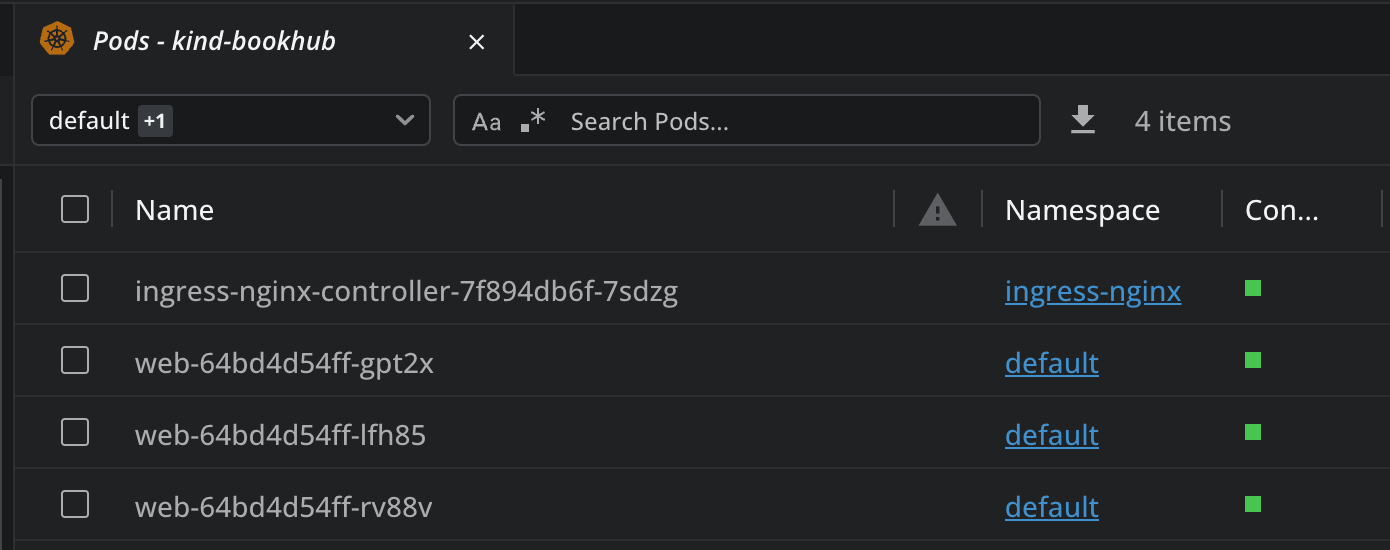
Next, let’s port-forward to the service and see what it shows us. I’m using Lens Kubernetes IDE for this, so I simply go to Network->Services, select the web service, and then click on forward as shown below. You can also use the kubectl port-forward command for this:
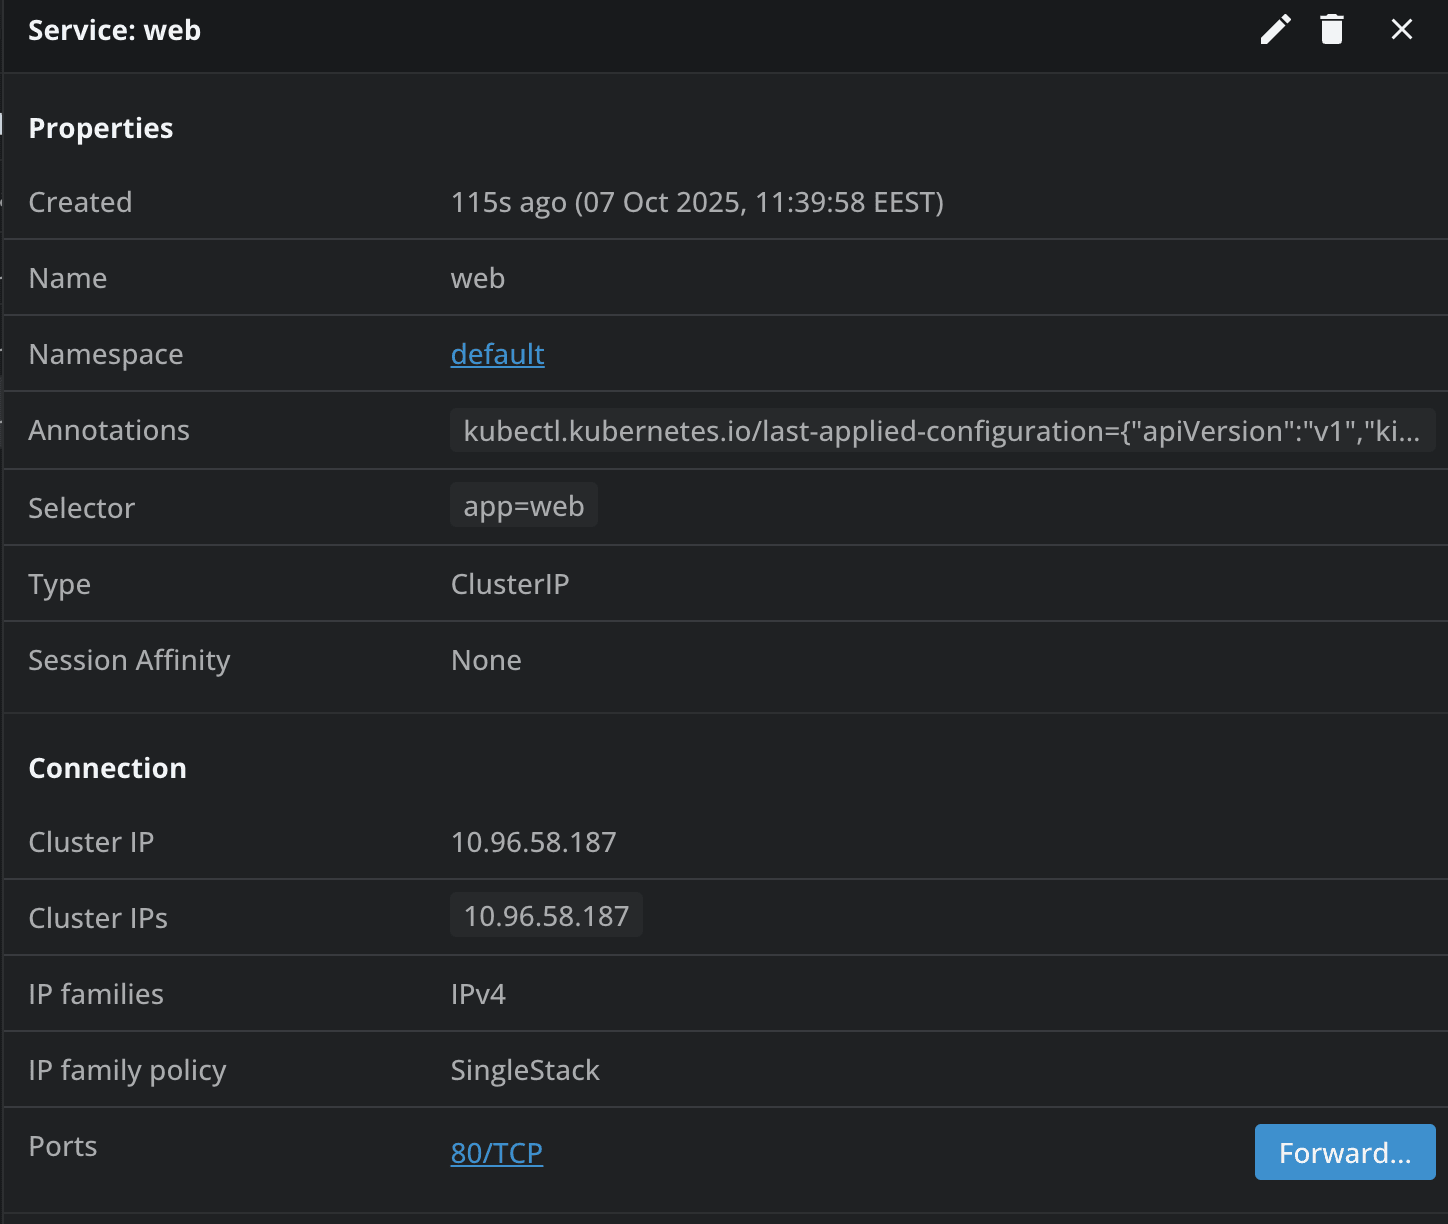
And you will receive a Hello from V1 message.
Now, let’s create another configmap that will help us serve the second version of the application. You can find it here.
Apply this one as well with kubectl apply.
As we have everything in place, let’s now start seeing the different deployment strategies in action.
1. Recreate strategy
The recreate strategy stops all the pods before starting new ones. This is useful for applications that can’t handle two versions at once (e.g., Database Schema changes), or for small internal tools or stateful workloads.
It is easy to configure, and you will never have any version conflicts, but this gives you downtime during rollout, and it is not suitable for user-facing APIs.
By using this example, you can see in the strategy type, that we’ve applied the Recreate strategy, and as soon as we apply the code, all the pods will be recreated.

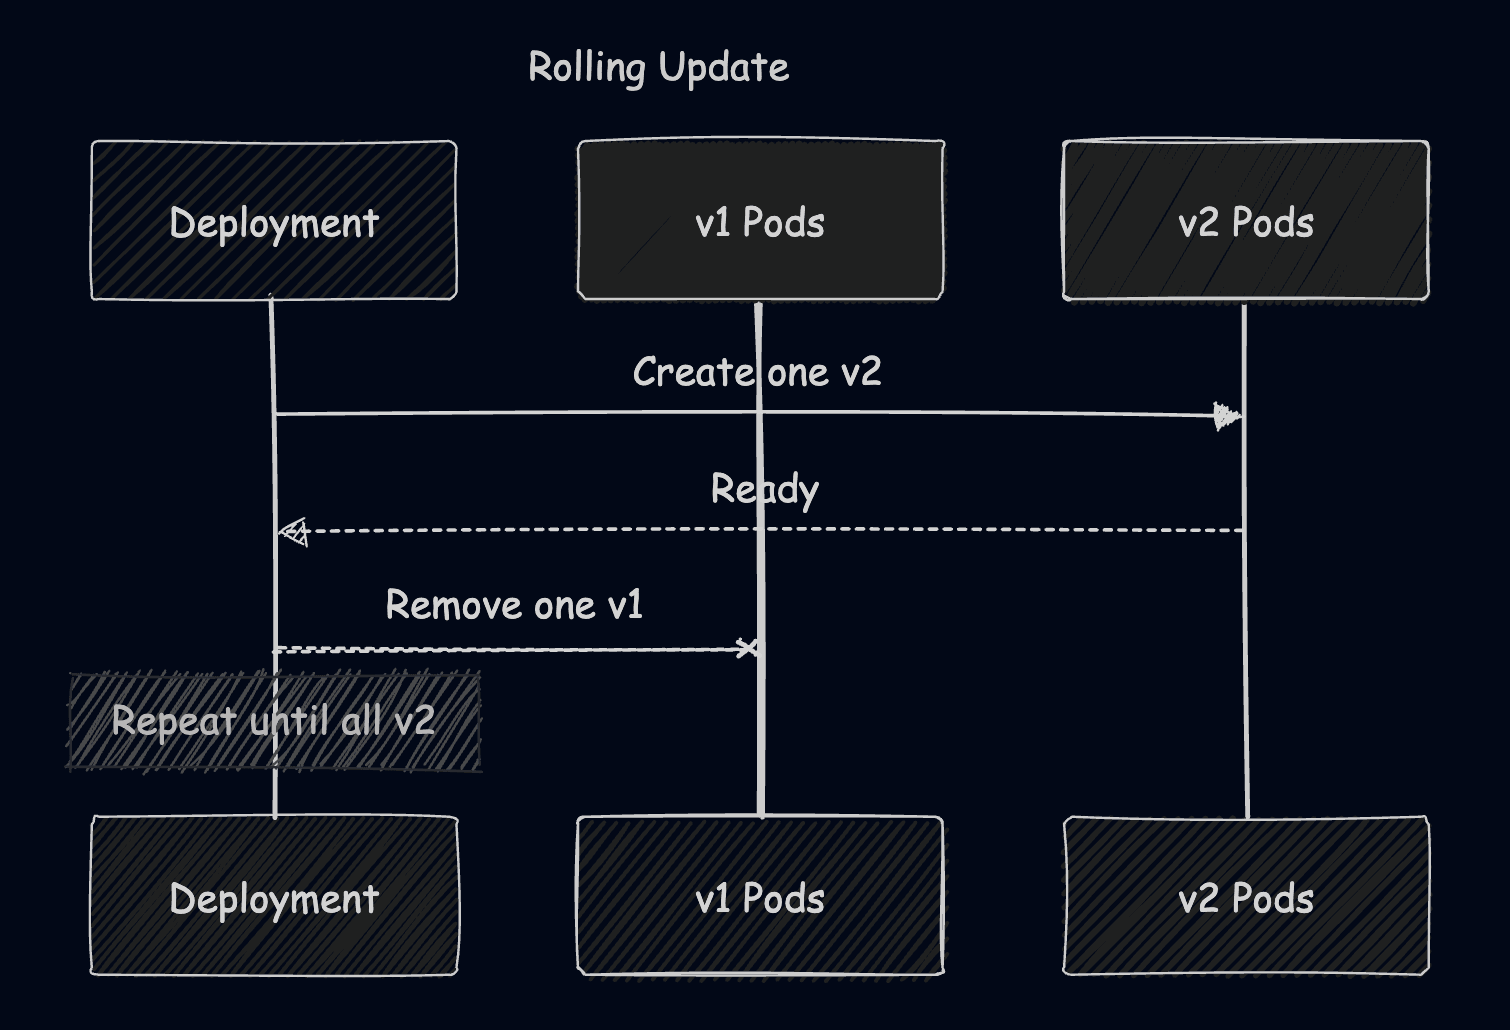
2. Rolling update strategy
This is Kubernetes’ default deployment strategy, and it will replace your pods gradually. You should use this strategy for most of your day-to-day updates, especially when dealing with stateless web APIs or microservices.
It provides near-zero downtime, easy rollback, and is built into kubectl. On the other hand, it has a slower rollback if rollout is partially complete, and it requires compatible versions.
By deploying this example, you will see pods getting gradually replaced, and as soon as a new one is ready, one of the old ones will be removed.
3. Blue/Green Deployment
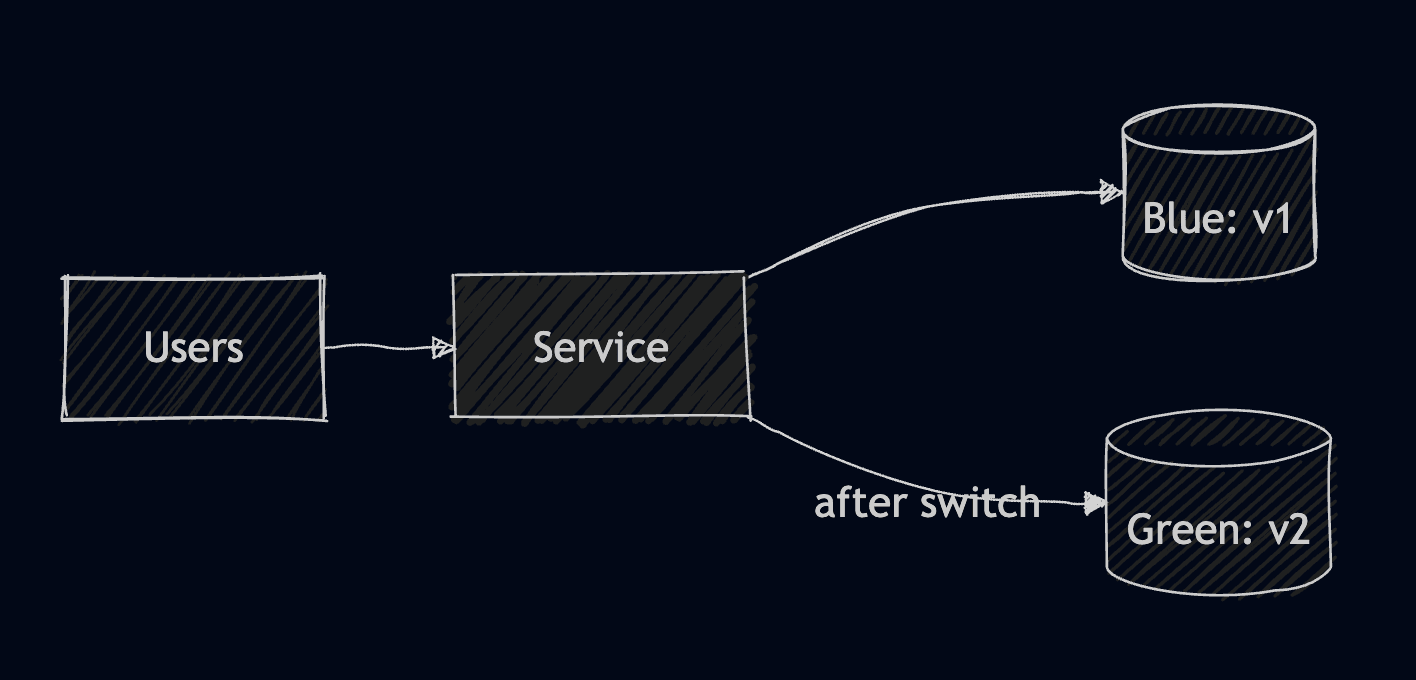
In Blue/Green, you run two environments, the blue one is usually the one that has the current version of the application, while the green one is the new version of the application. When you are ready with your changes, you flip your traffic instantly when you are ready.
Blue/Green is useful in mission-critical systems that need instant rollback and don’t accept any downtime. Its biggest con is the fact that it requires manual work or CI/CD coordination, and it also has double resource usage.
This example contains both blue and green deployments, and as you can see the service starts with blue.
Initially, if we had port-forwarded to the service, we would’ve seen the Hello from V1 message.
Let’s make a change to the service by applying this patch to ensure it now uses green:
Now, if we port-forward to the service again, we will see the Hello from V2 message.
4. Canary Deployment
In canary deployment, you send a small fraction of traffic to a new version. This is very useful when you are testing performance changes, and it can help you detect bugs faster in production. With it, you get an easy rollback, and you control the exposure, but the setup can be slightly more complicated, as it needs an ingress or meshes for traffic weights.
This example shows the base components required for a canary deployment.
Let’s apply a second ingress from here for the service under the same host, and use a weight for this one to ensure that only some of the traffic will be routed to it.
The weight is set to 25% so now if send requests to localhost, we should see that a quarter of the responses will go to the second one:
for i in {1..10}; do
curl localhost
done
<html><body><h1>Hello from v2</h1></body></html>
<html><body><h1>Hello from v1</h1></body></html>
<html><body><h1>Hello from v1</h1></body></html>
<html><body><h1>Hello from v1</h1></body></html>
<html><body><h1>Hello from v1</h1></body></html>
<html><body><h1>Hello from v2</h1></body></html>
<html><body><h1>Hello from v1</h1></body></html>
<html><body><h1>Hello from v1</h1></body></html>
<html><body><h1>Hello from v1</h1></body></html>
<html><body><h1>Hello from v1</h1></body></html>
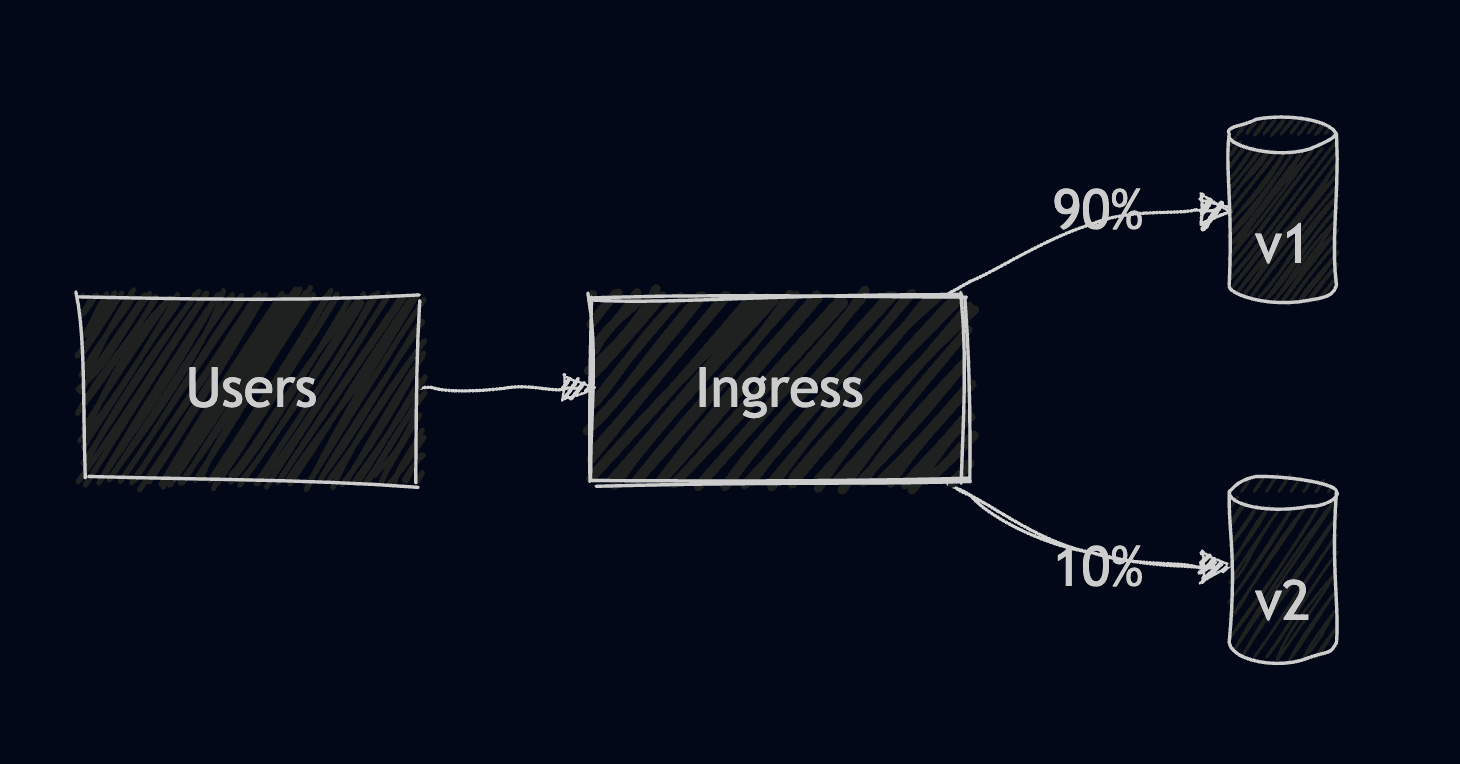
Here's how this looks like if the weight would've been set to 10%:
5. Argo Rollouts
To achieve automated promotion and metric based rollbacks, you can use Argo Rollouts or even Flagger. Argo Rollout automates your canary, blue-green deployments, or even a/b testing ones, integrating seamlessly with Prometheus or Datadog. The only issue with Argo Rollouts is that they have a higher complexity, making your setup harder.
To install Argo Rollouts you can simply run:
kubectl create namespace argo-rollouts
kubectl apply -n argo-rollouts -f https://github.com/argoproj/argo-rollouts/releases/latest/download/install.yaml
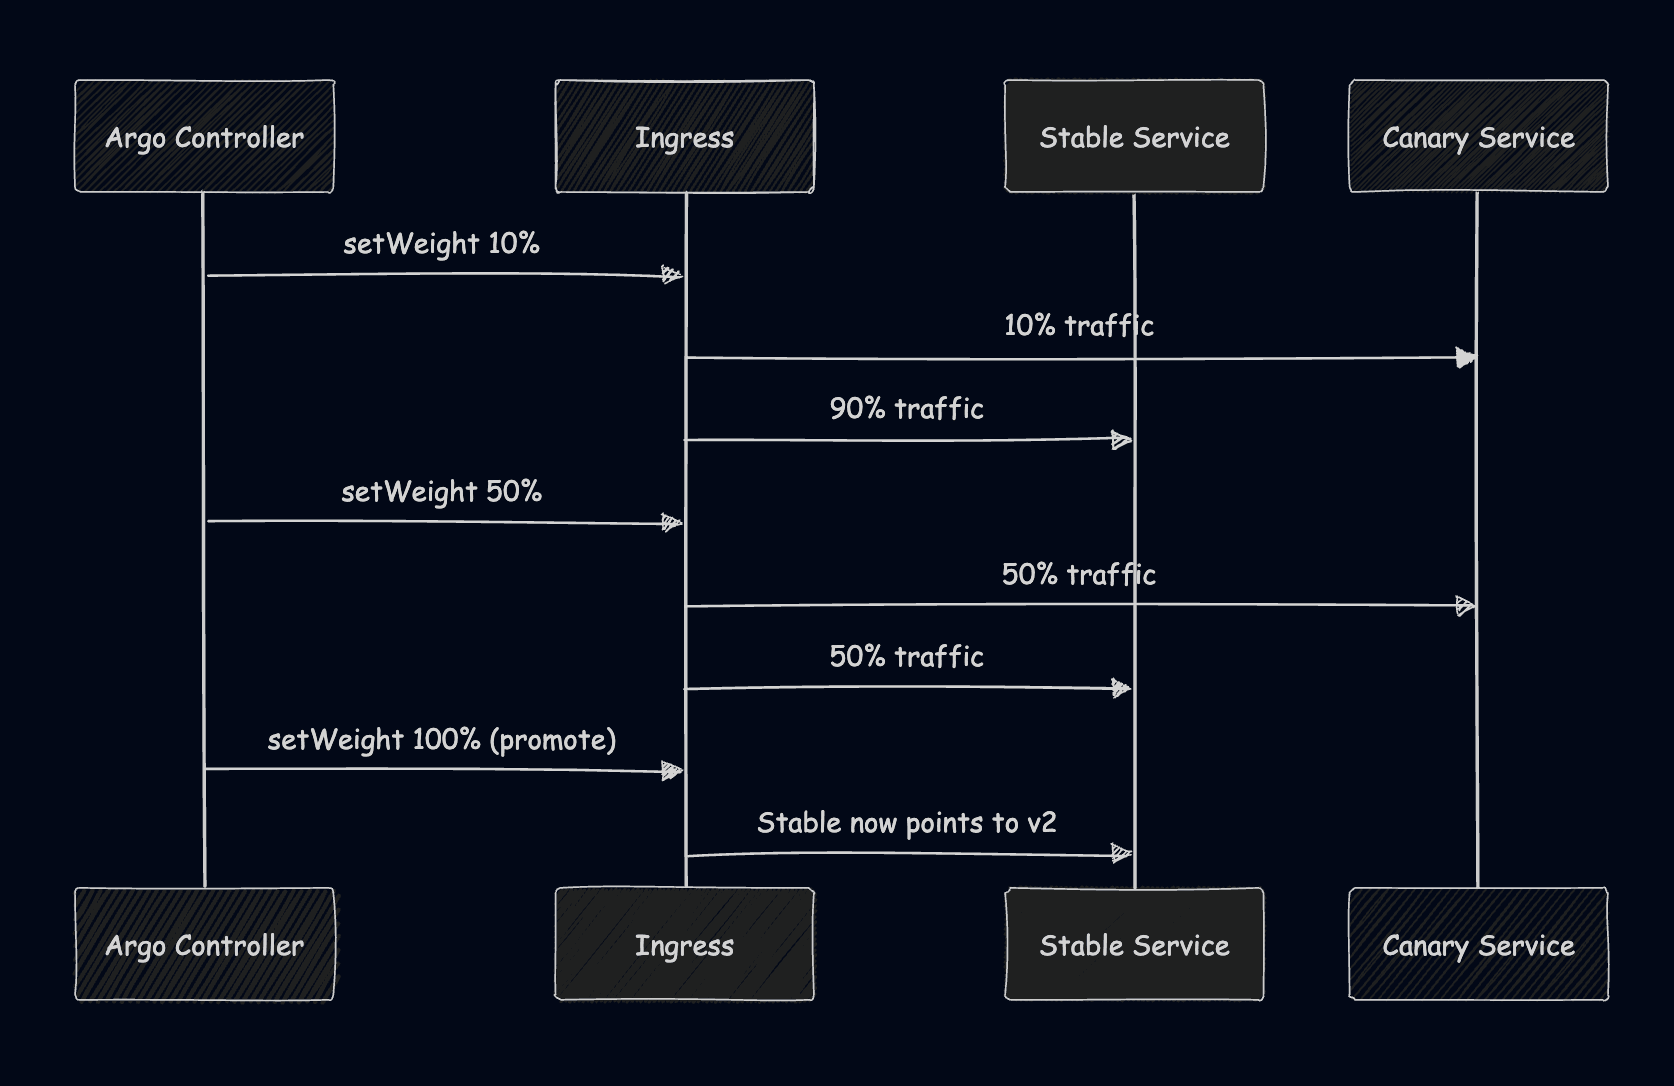
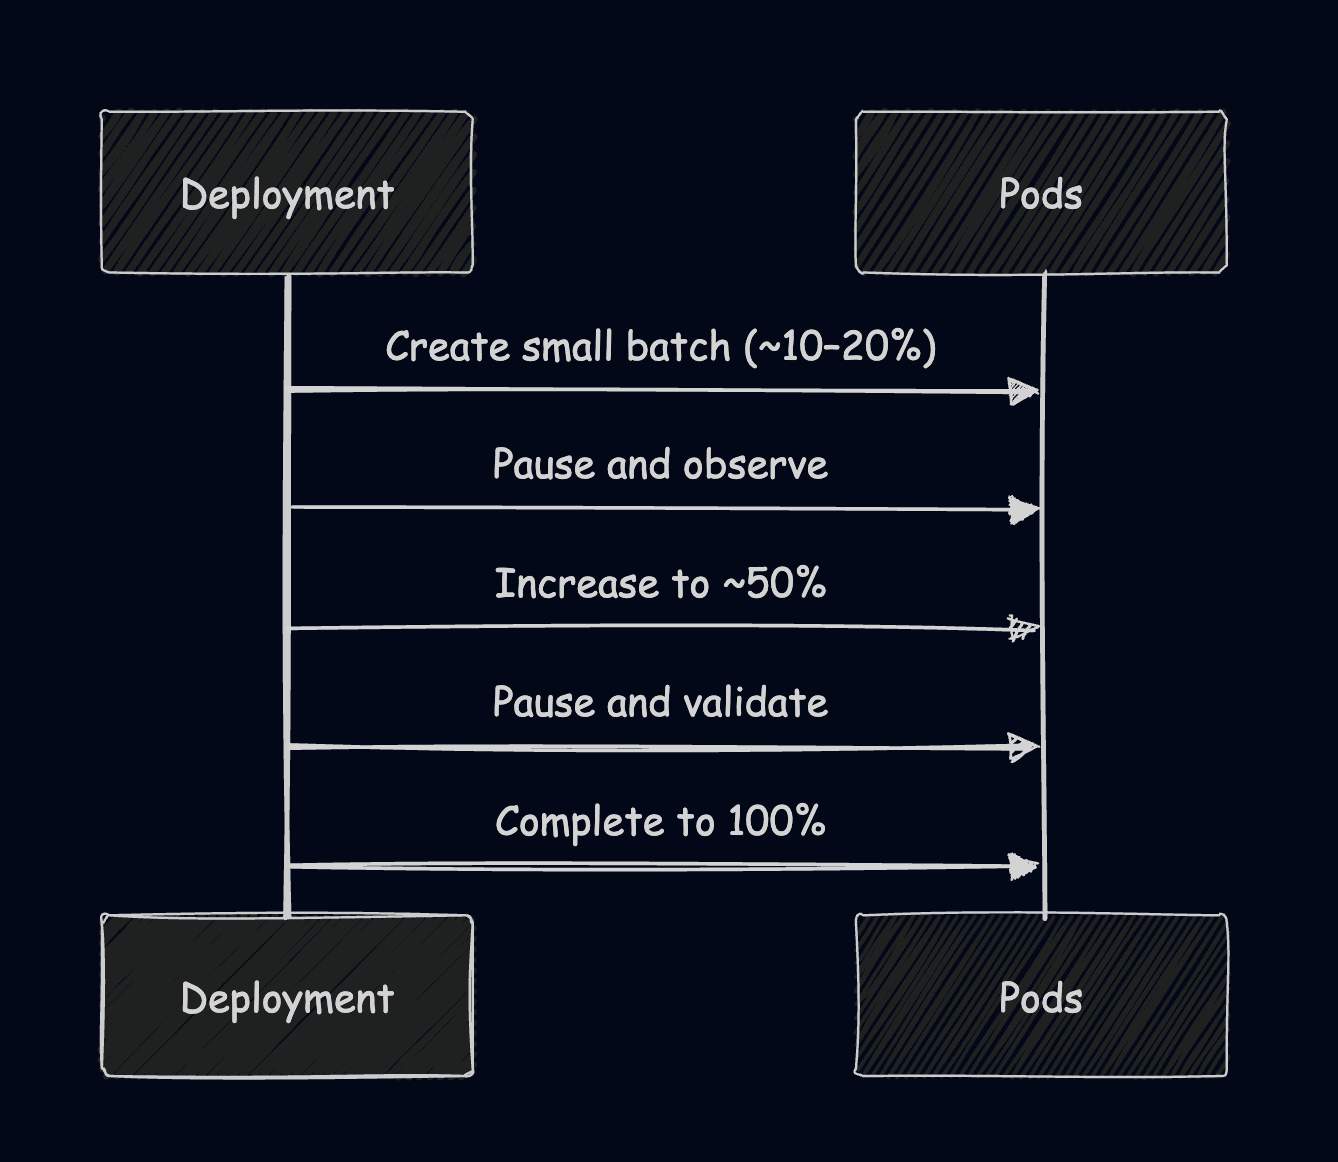
Now let’s use this manifest that will roll out our new version using canary weights, pausing for 1m. It will initially send 10% of the traffic to the new app, and after a one minute pause, it will send 50% to the new app, and then after another one minute pause, 100% to the new version.
After applying this code, we will see a response from v1:
curl localhost
<html><body><h1>Hello from v1</h1></body></html>
Now, let’s patch the rollout and change the stable app to be v2:
kubectl patch rollout web -n demos --type='json' -p='[{"op":"replace","path":"/spec/template/spec/volumes/0/configMap/name","value":"web-v2"}]'
If you have installed the argo plugin for kubectl you can watch the rollout like this:
kubectl argo rollouts get rollout web -n demos --watch
Otherwise, you can easily do ten curls and see:
1. As soon as we run the patch
for i in {1..10}; do curl -s http://localhost | grep -Eo 'v[12]'; done
v1, v1, v1, v1, v1, v1, v2, v1, v1, v1
2. After 1 minute
for i in {1..10}; do curl -s http://localhost | grep -Eo 'v[12]'; done
v1, v2, v1, v2, v1, v1, v2, v1, v2, v2
3. After 2 minutes
for i in {1..10}; do curl -s http://localhost | grep -Eo 'v[12]'; done
v2, v2, v2, v2, v2, v2, v2, v2, v2, v2
6. Shadow deployment
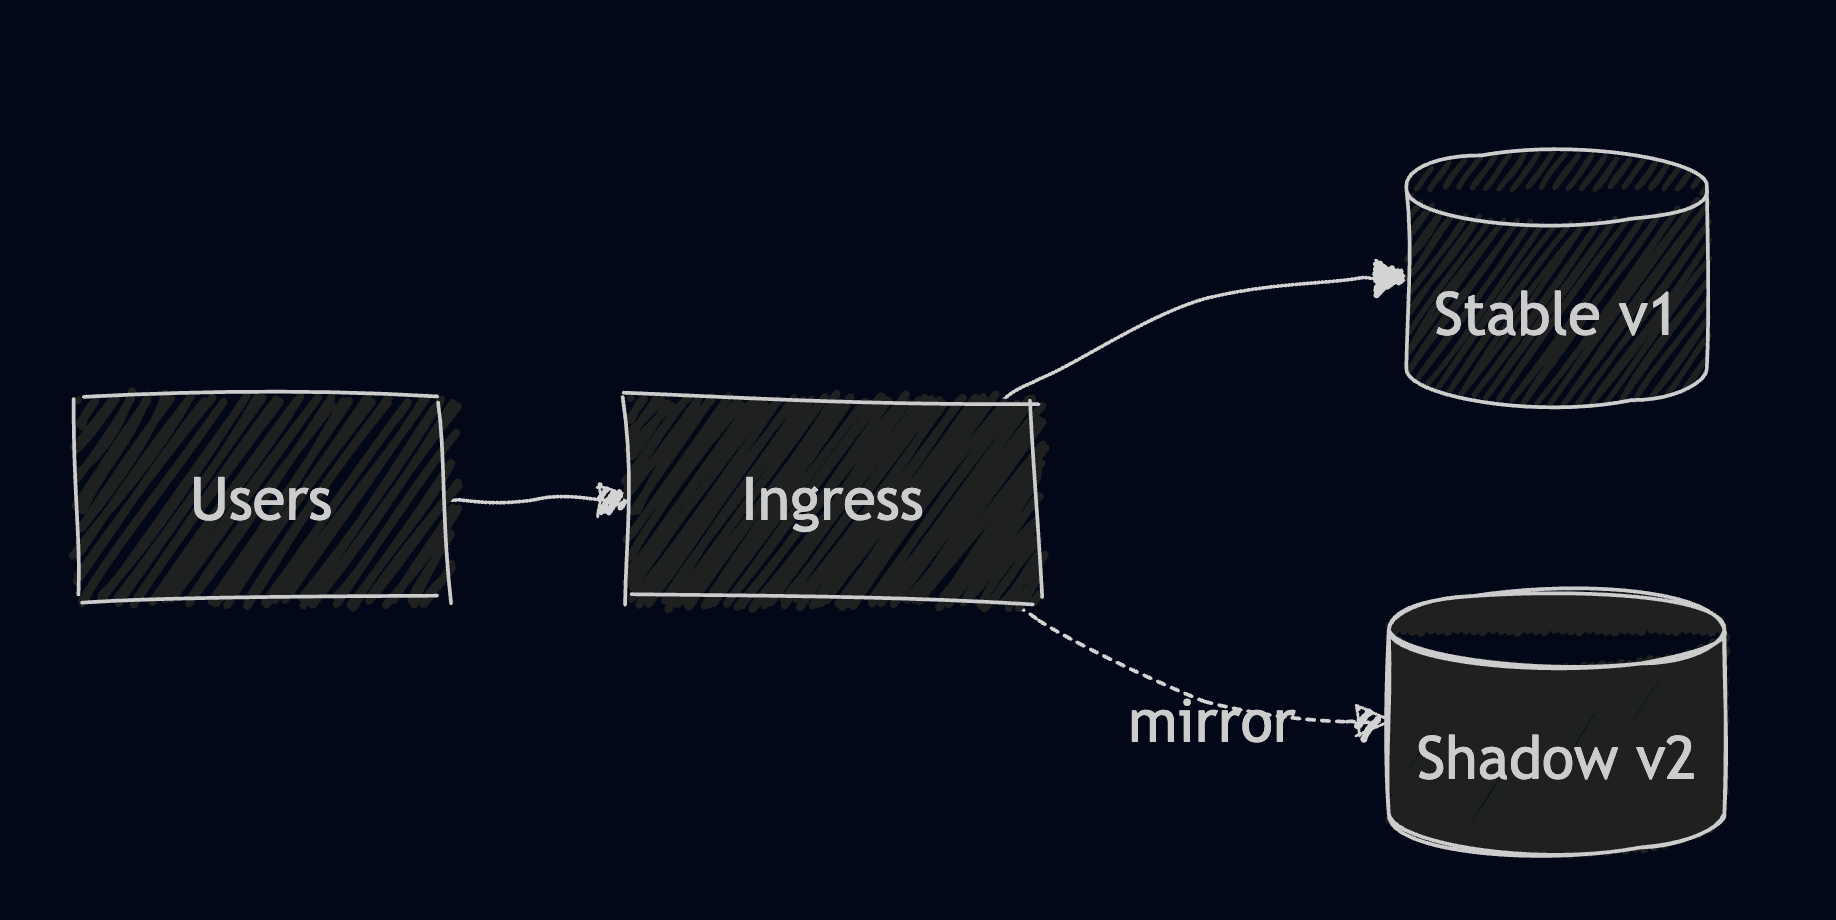
In this type of deployment you are duplicating real traffic to a new version but you are ignoring responses. This helps you test latency and performance, validates your traffic safely, and has no user impact. It does however have a double load, and it is only safe for idempotent operations.
After applying this example, if we do a GET request in localhost, we should see all the traffic getting mirrored to the shadow as well:
kubectl logs -f -l app=web,track=shadow --all-containers
10.244.0.5 - - [08/Oct/2025:08:09:27 +0000] "GET / HTTP/1.0" 200 49 "-" "curl/8.7.1" "-"
10.244.0.5 - - [08/Oct/2025:08:09:27 +0000] "GET / HTTP/1.0" 200 49 "-" "curl/8.7.1" "-"
10.244.0.5 - - [08/Oct/2025:08:09:28 +0000] "GET / HTTP/1.0" 200 49 "-" "curl/8.7.1" "-"
10.244.0.5 - - [08/Oct/2025:08:09:29 +0000] "GET / HTTP/1.0" 200 49 "-" "curl/8.7.1" "-"
10.244.0.5 - - [08/Oct/2025:08:09:29 +0000] "GET / HTTP/1.0" 200 49 "-" "curl/8.7.1" "-"
7. Feature Flags
With features flags you deploy your application once, but you enable features gradually using your configs. This helps you gradually expose new features by user segments, and it gives you instant rollout or rollback. It does, however, come with a lot of complexity over time.
Apply this example, and observe what happens when apply the feature flag, vs what happens when you don't apply it:
curl localhost
<html><body><h1>Hello from v1</h1></body></html>

curl -H "X-Flag: on" http://localhost
<html><body><h1>Hello from v2</h1></body></html>
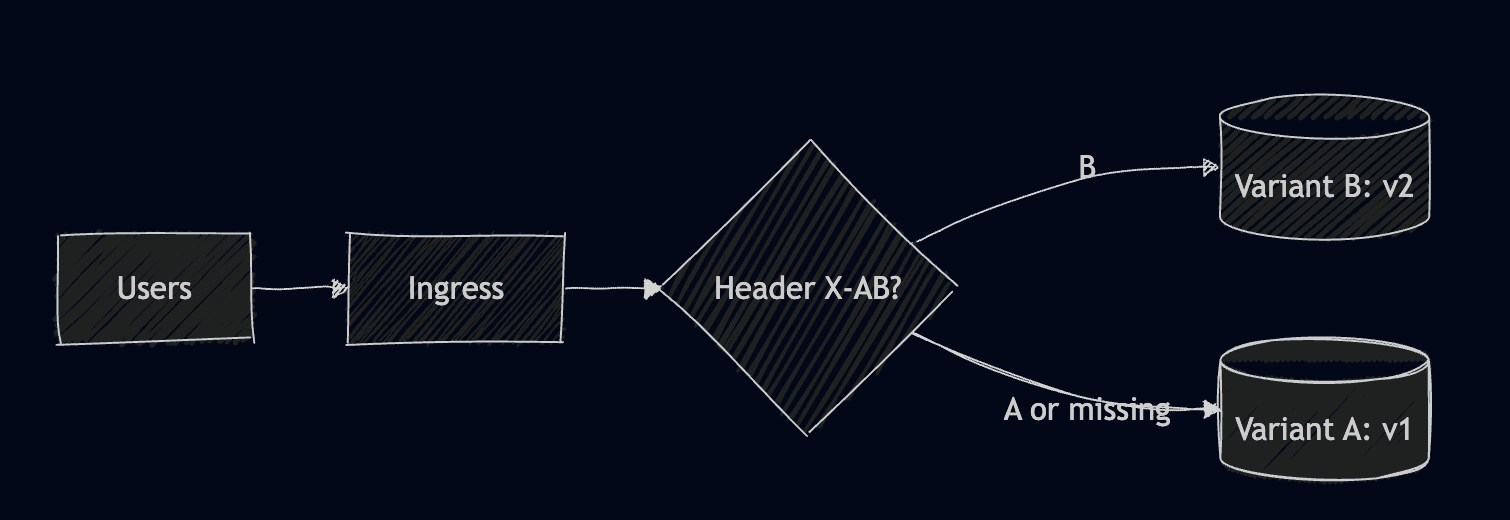
8. A/B Testing
If you are using A/B testing, you are experimenting with different versions of your application for specific user segments. This is different from canary, as it doesn’t shift traffic to one version, but actually serves your users multiple versions of your applications simultaneously based on different attributes. This is a controlled, experiment-based validation for your applications, but requires advanced routing (based on headers, or cookies).
By applying this example, if you are not providing the header, you will always get a response from v1, while providing the header, will get you a response from v2:
curl localhost
<html><body><h1>Hello from v1</h1></body></html>

curl -H "X-Group: test" localhost
<html><body><h1>Hello from v2</h1></body></html>
9. Ramped (Slow) Rollout
A ramped rollout is essentially a controlled, staged rolling update. In this case, you are not letting Kubernetes replace all pods, but you intentionally throttle the rollout speed and pause between steps to validate performance metrics. While this is safer than standard rolling update and works natively with Kubernetes, it has a longer deployment time, and it requires constant monitoring.
To do this kind of deployment, you will use the rolling update strategy and run kubectl patch and rollout commands.
kubectl patch deploy web --type='json' -p='[Something to patch]'

# Pause mid-rollout and resume after checks
kubectl rollout pause deploy/web

# Inspect logs or metrics
kubectl rollout resume deploy/web
kubectl rollout status deploy/web
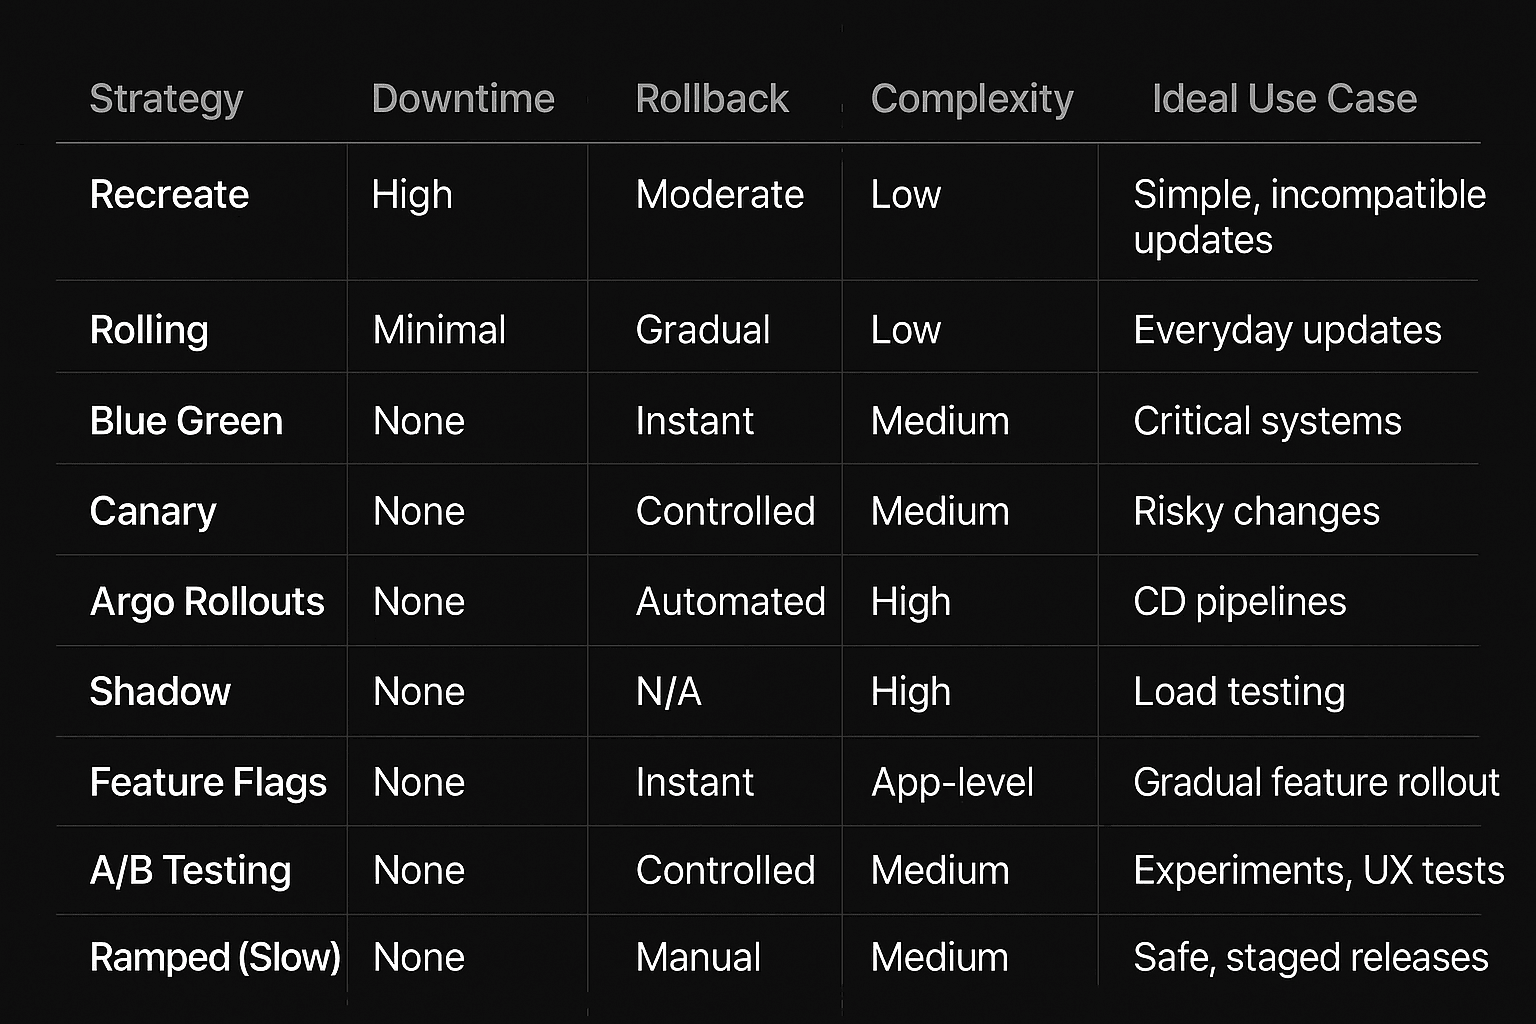
Strategies Comparison
How does Lens Kubernetes IDE help with Deployment Strategies?
Lens Kubernetes IDE equips you with everything you need for visually understanding these deployment strategies. If you encounter any issues, the Lens K8s IDE provides a way to easily attach to a pod, connect to its shell, and access the pod logs.
If you are using AWS EKS clusters, you can easily connect to your cluster using Lens' one-click AWS integrations, which support AWS SSO, Access Keys, or an IAM role.
On the other hand, if you need help with troubleshooting, Lens Kubernetes IDE offers a built-in context-aware, AI-assistant called Lens Prism. You can easily ask plain English questions about what is going on with your pods, and what is wrong with them, and apart from doing the debugging process for you, Lens Prism will provide you with solutions that you can easily run to make everything work.
If you want to learn more about how Lens can help with your Kubernetes management, check out this article.
Key points
In this article, we’ve explored the top deployment strategies that you can apply when you are using Kubernetes by leveraging a real-world example. We’ve gone through multiple strategies and saw where they excel and where they have issues.
To pick the right strategy for you, start with your risk and rollback needs: for routine updates use the Rolling update strategy, Blue/Green when you need an instant flip and rollback, Canary when you are shipping riskier changes, A/B when you want to test different features, Shadow to validate performance and side effects, Ramped when you want to control your rollout, Feature Flags when you want to enable features just for a handful of users initially, and Argo Rollouts when you want something fully automated.
If you want to take advantage of these strategies and achieve AI Debugging, download Lens today.